Whether you have a simple blog or a business website, the “contact us” page is compulsory. And, there are dozens of Contact Form plugins available, when it comes to WordPress.
“Contact Form 7” or “CF7” is one of the simplest and smartest Contact Form Plugins for WordPress.
The best part – all the features of the plugin are 100% free. And, the only negative part – it doesn’t store the Form’s data anywhere. You need to set up other arrangements for that.
In this post, I will be explaining how you can store the Contact Form 7 data in a Google Sheet using a plugin called CF7 Google Sheets Connector. And, with this hack, CF7 will not just be a Contact Form plugin, you can also use this setup to generate leads.
Here, we go with the CF7 to Google Sheets tutorial:
Installing the “Contact Form 7” Plugin
If you haven’t already, first, install the CF7 plugin.
Create the Form with all the required fields by clicking on the “Add New” button and copy the “Shortcode” of the form.
Now paste the “Shortcode” on the page/post/sidebar that you want the form to be present on.
Installing the “CF7 Google Sheets Connector” Plugin
Now, it’s time to install the 2nd plugin (CF7 Google Sheets Connector) which will send the Contact Form’s data to the Google Sheet.
After installing the plugin, you will have to get the authorization code from your Google account by clicking on the “Get Code” button on the plugin’s setting page.
Connect your form to the respective Google Sheets spreadsheet and done — as simple as that.
Here’s a short video explaining everything in detail:
Integrating Contact Form 7 with Google Sheets
To integrate you’ll need to install a plugin called ✅ CF7 Google Sheets Connector as shown in the above video. After installing and putting the license code, go to CF7 Google Sheets Connector settings and click on the Get Code which will take you to CF7 authorization with Google sheet page, and ask you to log in and authorize with your Google account where your form data will be saved.

After logging in with your Google ID, it will ask you for permissions to view and manage your spreadsheets in Google Drives, allow by clicking the allow button.
Since you have logged in and authorized the CF7 Google Sheets Connector plugin to view and manage your spreadsheets, here comes the last and main step.
Setting Up CF7 and Google Sheets
#1. Steps to do in the Google Spreadsheet
1. Open https://docs.google.com/spreadsheets in your browser which will ask you to login with the Google account you just verified CF7 with, if not already logged in.
2. Create a new sheet and name it anything you want.
[If you have the free version of the plugin then proceed step #3, paid version does it automatically.]
3. In Google Sheets, provide the Columns name in Row 1. Name the first column as Date if you want to keep the record of the date. For further columns, name it as the form tags from the Contact Form 7. (For eg. “your-name”, “your-email”, “your-subject”, “your-message”, etc).
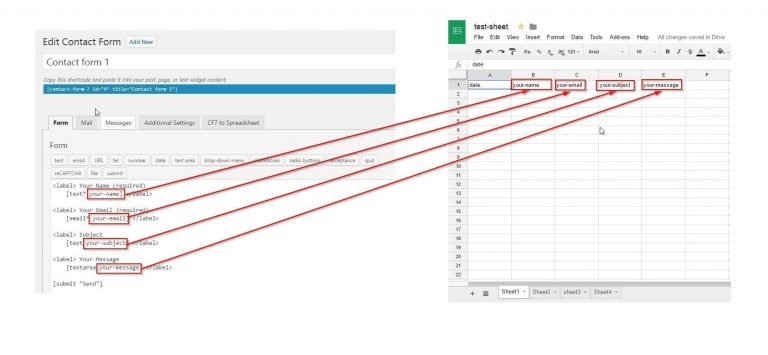
In the free version, you have to do this step manually, but the paid version does it all automatically. Refer to the above video.
#2. Steps to do in the WordPress Admin Dashboard
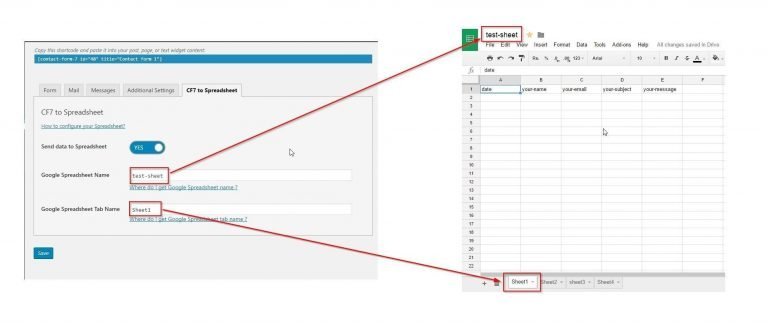
- Go to Contact Form 7 and click on the form you have created earlier, and go to the Google Sheets tab.
- There should be two fields asking “Google Sheet Name” and “Google Sheet Tab Name”. Fill out both the details. In the field, Google Sheet Name, fill the name of the spreadsheet name you just created and in the Google Sheet Tab Name, write the name of the tab you just created in the Google Sheets.
[Again, step #2 is not required in the free version.]
You can understand better with the image below.
After this, you’re done.
You can now test the setup by filling and submitting the contact form you created. When you fill the form with the required details, the data will immediately appear in the Google Sheet of your Google account.
CF7 Google Sheets Connector Pro vs Free
If you need a small CF7 and Google Sheets setup then the free version is just enough. But, if you really want to take advantage of the flexibility of the plugin then you should definitely consider upgrading it to the premium version. For a license of 1 site, it just costs $29/year.
In the free version, you need to set up everything manually and the free version doesn’t send an image or attachment kind of data to the Google Sheets; whereas the Pro version sets up automatically and supports many field types including images and attachments.
Here’s what the CF7 Google Sheets Connector Pro version can do:
- one click authentication
- automated sheet and tab names
- automated click and fetch all your Google Sheets
- quick configuration
- multiple forms to sheets
- automatic updates
- sends image and PDF attachment links to the Google Sheets
- custom tags support
- priority support
Also, they offer a 10 days money-back guarantee too. In case, you’re having trouble setting up your app or any other kinds of difficulty, you may get your full refund within 10 days.
Using the free version?
No problem. Below, I have solved some common issues that people face during the setup.
Update: 11 April 2019
Does this CF7 to Google Sheets Setup Work with the Check-boxes and Radio Buttons?
And, the answer is YES. It works perfectly with the checkboxes and the radio buttons.
Let me break this step-by-step.
How to Create a Check-box in Contact Form 7?
You know the initial process of creating a new form already, so let me skip right to the checkbox part.
In order to insert check-box, click on the checkboxes option which will open a new popup where you will have to enter all the details including Name and the Options, as shown below.
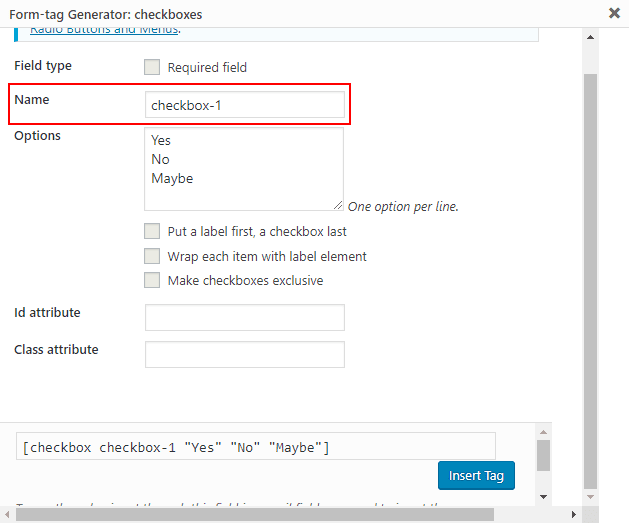
Please note that the text you write in the Name field will be the column name in the Google Sheets.
Click on the Insert Tag and the checkbox will be inserted in the form.
How to Create a Radio Button in Contact Form 7?
Like the checkboxes, you will have to click on the radio buttons and it will open a popup where you will have to fill out the Name and the Options field as shown below.
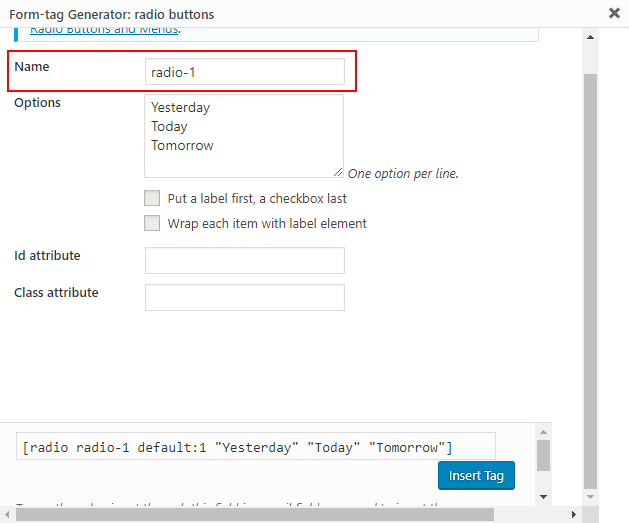
And, the text you enter in the Name field will be the column name in the Google Sheets as I explained in the checkboxes option.
Click on the Insert Tag and the radio button will be inserted in your form.
Sending Checkbox and Radio Button Data to the Google Sheets
As I mentioned previously, the text you enter in the Name fields of the checkbox and radio button will have to be put as the column name in the Google Sheets.
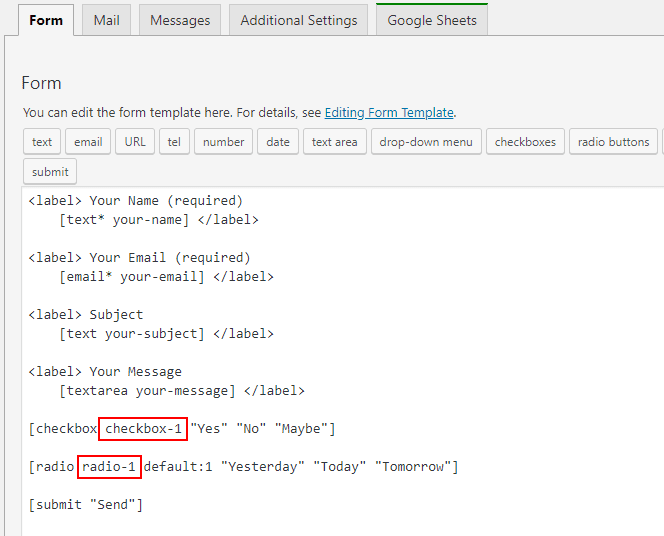
Create new columns in your existing Google Sheets where the first row of the columns will be the Name field of the checkbox and radio button as shown in the above screenshot.
Here’s how it will look in the Google Sheets,
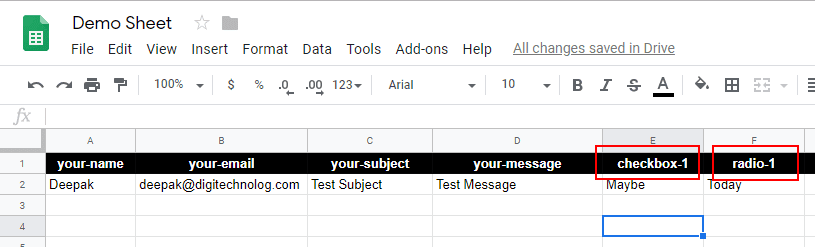
And, as soon you complete the setup, all the Contact Form 7 data will start reflecting in the Google Sheets after someone fills in the form.
Update: 13 October 2019
Add Date and Time Automatically
Some people asked me in the comments, is this possible to add time and date to the Google Sheets entries automatically?
In other words, if someone fills up the form, along with the form details it should automatically add a time-date cell in that row so that you can know at what time the form was submitted.
And, there’s a very simple way to do that.
Just open up your Google Sheets where you’re collecting the data and add two columns with names “date” and “time” (without quotes). You can add these columns on the left side, right side, or anywhere in the same spreadsheet.
Take a look at the below screenshot for better understanding:
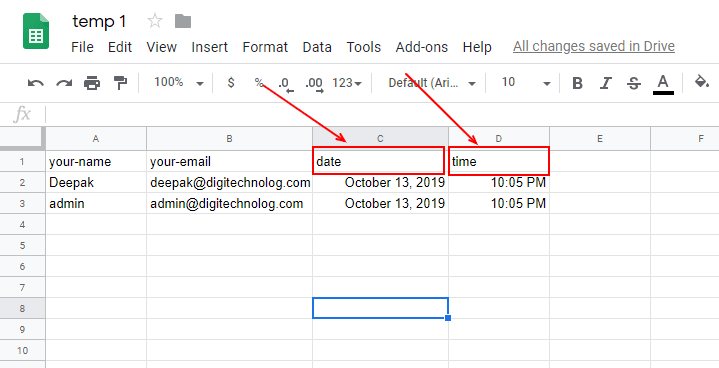
And, after adding these 2 columns, as soon as someone submits the form, all the form entries along with the submission date and time will be reflected in your Google Sheets immediately.
That’s it.
If you have any related queries or doubts, feel free to let me know in the comments right now.
Also, share this trick with the people who you think might be interested in reading it.
Recommended: Send Elementor Form Data to Google Sheets without Zapier
Leave a Reply to Filip Cancel reply